Sunday, September 28, 2014
New Option
I added a new option to my Commission page. Dapples! I'll have a few examples in my portfolio shortly.
Saturday, September 27, 2014
Creating a Flaxen Liver Chestnut - Part Two
Here's what you need:
- brushes
or q-tips for applying color
- horse
- reference
picture
- matte acrylic sealer
- Brown 610 or a reddish brown pastel
- Chocolate brown pigment or pastel
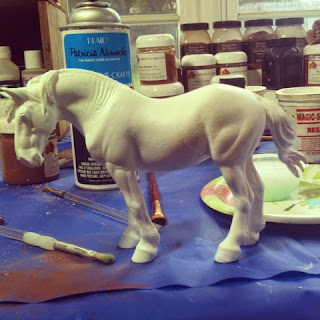
Today we'll cover finishing the base coat and the very beginning of the shading. As always make sure to have a reference picture close by!

In part one, I pasteled three layers of pigments onto my drafter. The horse is pictured in its fourth layer. I uses a wet pigment technique that I am still developing to get the Brown 610 solid.

When the sealer dried I pasteled another layer of Brown 610 and then blended my chocolate brown pigment across the top line. With that, my base coat was finished and the shading had begun!


In the next installment, I'll continue the shading.
Friday, September 26, 2014
An Update
Hey all! Just wanted to let you know that I've entered Intersport/Intermediare on October 12th! Come say hi if you see me. I plan to have my draft resin finished by then so wish me luck. Hopefully I'll have the next part of my chestnut tutorials up sometime this weekend so keep an eye out for that too!
Saturday, September 20, 2014
Prepping Progress
So in the midst of working on commissions, I have been working on a few horses for myself.
 |
| In the later stages of prepping |
 |
| Just started |
 |
| also just started |
Wednesday, September 17, 2014
I Finished the Band Props!
Remember how I mentioned that I was making band props? Well I finally finished them!
All three standing side by side, with me in the middle...
A close up of Le Mis....

and Phantom of the Opera...

and finally West Side Story...

All three standing side by side, with me in the middle...
 |
and Phantom of the Opera...
and finally West Side Story...
They were definitely a challenge, but worth it! I'm very proud of how they turned out.
Monday, September 1, 2014
Creating a Flaxen Liver Chestnut in Pigments and Pastels - Part One
Here's what you need for this part:
- brushes or q-tips for applying color
- prepped horse
- reference picture
- Brown 610 or a reddish brown pastel
- acrylic sealer
First, find a reference picture for your project. You can use one ref picture for your model or two - one for the color and one for the markings.
 |
| photo from http://www.proudmeadows.com/breeding_rondo.asp |
After that, make sure your model is completely prepped. For this tutorial I'm using Pretty Girl (name pending). You can buff it if you want, but it is not required as this is going to be a dark color and you'll be able workout any grain issues in the layers.
Start with a coat of Brown 610 or an equivalently colored pastel. Seal in three layers.
 |
| First layer unsealed |
 |
| First layer sealed |
 |
| Second layer sealed |

Subscribe to:
Posts (Atom)