Friday, December 26, 2014

Merry Christmas!

....a day late :-)
Christmas was wonderful. I recieved some awesome gifts this year, including water mixable oil paints ( I can't stand the scent of turpentine and would like to avoid some of the more negative effects of the fumes) and a new puppy!

His name is Kristoff

My mother loved her present! I am definitely proud of it as I usually prefer pencil and pastels to acrylics when doing flat art. 


I hope you had just as wonderful holiday as I. Over the break I will be able to work on commissions and will also be working on some custom dolls for an English project (we get to create a box set for Shakespeare's The Tempest and I am contributing action figures).

Sunday, December 14, 2014

An Owl Update

The last time you saw this owl he looked like this:


He went from that to looking like this:


To this:

To this:
To this:


And, finally, to this last Thursday:


It's almost finished! I just need to put some finishing details on and then wrap it up, because my mom asked for it as a Christmas gift!
If there is anything you would like me to write about, model horse related or anything else, just let me know in the comments!

Monday, December 1, 2014

Happy Belated Thanksgiving!

Whew! It's been a busy few weeks so Thanksgiving break has been a welcome respite. I have a few things to be thankful for too - of course my family and friends are one of them! They have always supported me and my crazy ideas. They are also very supportive of my decision to major in Art Education. That leads me to the next thing, recently I received an acceptance letter from Moore College of Art and Design, my top school.

Now on to commissions! Riptide and Freckles are in their second layers of white. Apache and Whisper are still having their colors worked on, but are in the final stages of that.


Thank you to all my loyal readers as well. Without you this blog would be nothing. :o)

Saturday, November 15, 2014

An Update and an Owl

Hey everyone! Sorry for my lack of posting lately. Just wanted to let everyone know that commissions are coming along slowly but surely. Most of my Thanksgiving break will be dedicated to working on commissions, so keep an eye out for pictures!

And as a treat - a sneak peak of a painting I'm working on!


Saturday, October 4, 2014

Creating a Flaxen Liver Chestnut - Part Three

Here's what you need:


  • brushes or q-tips for applying color
  • horse
  • reference picture
  • matte acrylic sealer
  • Brown 610 or a reddish brown pastel
  • Chocolate brown pigment or pastel 
  • Dark chocolate brown pigment or pastel
  • Black pigment or pastel
To shade the horse, I created a mix of the chocolate brown pigment, dark chocolate brown pigment (pictured below), and black pigment. This crests a dark brown, almost black mixture.

Final picture
Next, apply three to four layers of the pigment mixture.


After the dealer has cured, apply brown 610 around the outer edges of the shading. Apply and blend the darker mixture and seal the layer. This creates softer line of delineation between the shading and base color. 


After that has cured, alternate between black and white pigment on the muzzle, the eyes, and the genital area. The method I use for creating a flaxen mane and tail is depicted in these two videos by K Smith Equine Creation -

If y'all have any requests just post them in the comments!

Sunday, September 28, 2014

New Option

I added a new option to my Commission page. Dapples! I'll have a few examples in my portfolio shortly.

Saturday, September 27, 2014

Creating a Flaxen Liver Chestnut - Part Two


Here's what you need:

  • brushes or q-tips for applying color
  • horse
  • reference picture
  • matte acrylic sealer
  • Brown 610 or a reddish brown pastel
  • Chocolate brown pigment or pastel 
Today we'll cover finishing the base coat and the very beginning of the shading. As always make sure to have a reference picture close by!


In part one, I pasteled three layers of pigments onto my drafter. The horse is pictured in its fourth layer. I uses a wet pigment technique that I am still developing to get the Brown 610 solid.


When the sealer dried I pasteled another layer of Brown 610 and then blended my chocolate brown pigment across the top line. With that, my base coat was finished and the shading had begun!


In the next installment, I'll continue the shading. 

Friday, September 26, 2014

An Update

Hey all! Just wanted to let you know that I've entered Intersport/Intermediare on October 12th! Come say hi if you see me. I plan to have my draft resin finished by then so wish me luck. Hopefully I'll have the next part of my chestnut tutorials up sometime this weekend so keep an eye out for that too!

Saturday, September 20, 2014

Prepping Progress

So in the midst of working on commissions, I have been working on a few horses for myself.

In the later stages of prepping
Just started
also just started


Wednesday, September 17, 2014

I Finished the Band Props!

Remember how I mentioned that I was making band props? Well I finally finished them!

All three standing side by side, with me in the middle...

 A close up of Le Mis....

 and Phantom of the Opera...


and finally West Side Story...


They were definitely a challenge, but worth it! I'm very proud of how they turned out.

Monday, September 1, 2014

Creating a Flaxen Liver Chestnut in Pigments and Pastels - Part One

Here's the liver chestnut tutorial I promised!

Here's what you need for this part:

  • brushes or q-tips for applying color
  • prepped horse
  • reference picture
  • Brown 610 or a reddish brown pastel
  • acrylic sealer 

First, find a reference picture for your project. You can use one ref picture for your model or two - one for the color and one for the markings.
photo from http://www.proudmeadows.com/breeding_rondo.asp
After that, make sure your model is completely prepped. For this tutorial I'm using Pretty Girl (name pending). You can buff it if you want, but it is not required as this is going to be a dark color and you'll be able workout any grain issues in the layers.


Start with a coat of Brown 610 or an equivalently colored pastel. Seal in three layers. 

First layer unsealed

First layer sealed

Second layer sealed

Third layer sealed
In the next post I'll cover darkening her up.


Sunday, August 31, 2014

Creating a Sorrel in Pigments and Pastels - Part One


Today, I'll show you the first couple of steps to creating a copper chestnut or sorrel horse. For the the purpose of this tutorial I will refer to this color as sorrel, because I will also be doing a flaxen liver chestnut tutorial (hopefully) simultaneous to this one.

As defined by Wikipedia "Sorrel is an alternative word for one of the most common equine coat colors in horses. While the term is usually used to refer to a copper-red shade of chestnut, in some places it is used generically in place of "chestnut" to refer to any reddish horse with a same-color or lighter mane and tail, ranging from reddish-gold to a deep burgundy or chocolate shade. The term probably comes from the color of the flower spike of the sorrel herb."

On to the actual making of the color! First, as with any other horse color, find a reference picture! Since the horse I'm using is a commission - here is the picture I was given to use -

photo provided by Ashley Johnson
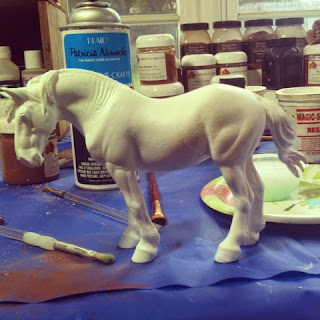
First I break out on of my rarely used colors (mostly because I've been addicted to bays and blacks...shhhh). Havana Ocher is a nice orangeish brown color that goes on with a medium stain. 


I paint the color on for two layers. It went on fairly dark for the first layer, and for the second layer it only caused minimum color change.

first layer

second layer
In the next installment I'll darken this guy up a bit then work to redden his coat, if all goes well. Also keep your eye out for my liver chestnut tutorial which should be up soon!

I Survived!

Well, the first week of school is over and I survived. I have a paper due almost everyday next week, but that's what long weekends are for ;-). I have a few commissions to show you further down post, and I'm also painting band props which will be the subject of a later post. So without further adieu, the commissions in their first layer of color!

Monday, August 25, 2014

Now Taking Commissions

My books are now open! You can find my commission terms and portfolio in the tabs above.

Sunday, August 24, 2014

School is Here

Well school starts on Tuesday for me (my senior year). Each year I create a custom planner - here is this year's - 


I have also been painting props for my school marching band (10 foot banners). I'll try to post pictures of them when I am finished. 

Wednesday, August 13, 2014

Poco is Finished!

She'll be shipped out to her new owner Taylor Hagquist on Friday. Here are her final pictures -


She is done in pigments and detailed with acrylics and has a resculpted mane and tail. I included a base with sand and a small amount of water detail because Poco sometimes has a hard time standing. 
On another topic, is there any tutorials ya'll would like to see? Comment your ideas below!

Monday, August 11, 2014

Poco's Starry Night - Part Two

This girl is almost finished. I just need to touch up some of the white markings and hooves.

white markings started
facial marking
almost completed
the other side